Highlight source code lines in LaTeX
I love LaTeX for any kind of text writing (actually typesetting), simply because it creates so nice looking and consistent layouts. And, of course, because I can write it in my favorite text editor. We use LaTeX especially for presentation slides at Qafoo, since the beamer package provides such a convenient environment. Combined with listings package, presenting source code snippets with nice syntax highlighting has never been easier. However, there was one problem we did not solve, yet, until some days ago: Highlighting certain source code lines of a listing on different slides.
So, let me give an example on when you want to highlight certain lines of a listing on different slides of your beamer presentation. The following listing shows how you can convert an XHTML document into a PDF, using the Apache Zeta Components Document component:
<?php
require 'autoload.php';

// Convert some web page to PDF
$xhtml = new ezcDocumentXhtml();
$xhtml->setFilters( array(
    new ezcDocumentXhtmlElementFilter(),
    new ezcDocumentXhtmlXpathFilter( '//div[@class="content"]' ),
) );
$xhtml->loadFile( 'consulting.html' );

// Load the docbook document and create a PDF from it
$pdf = new ezcDocumentPdf();
$pdf->options->errorReporting = E_PARSE | E_ERROR | E_WARNING;

// Load a custom style sheet
$pdf->loadStyles( 'custom.css' );

// Add a customized header
$pdf->registerPdfPart( new ezcDocumentPdfHeaderPdfPart(
    new ezcDocumentPdfFooterOptions( array(
        'showPageNumber'     => false,
        'height'             => '10mm',
    ) )
) );

$pdf->createFromDocbook( $xhtml->getAsDocbook() );
file_put_contents( __FILE__ . '.pdf', $pdf );
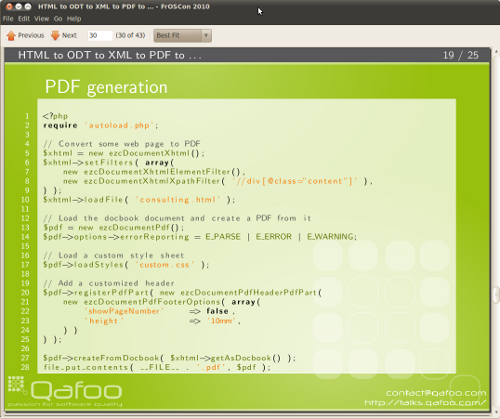
The actual content of the listing is not important here, what really matters is its length and complexity. Of course the code is not highly complex in itself, but it is, if you are watching a presentation and suddenly a slide appears which shows the code. Using the LaTeX listings package, you already get a nicely highlighted visualization out of the box, including line numbers and possible other goodies:
 LaTeX beamer highlighting
You can click on the image to enlarge it, so you can better see how nicely the lisiting is typeset with custom highlighting colors and line numbers.
So, when presenting such a listing, it is likely to overwhelm people. Their focus will be on reading the full listing and understanding it and it is hard to draw their attention to the specific parts you are talking about at a given moment. You can try by pointing at the specific lines using a laser pointer or your finger or even just by naming the specific line numbers. However, have a clear visual indication on your slides is much more effective.
Our idea was therefore, for a longer time now, to visually highlight certain lines by changing their background color. This is not an easy task in LaTeX. One way to solve this issue is to put additional LaTeX commands into the listing, using the lstlisting escape character. This works out, but basically makes your listing code unmaintainable, even unreadable. In addition, you cannot use the lstinputlisting command any more, which allows you to include lisitings directly from a source file, which is what you usually want to be doing instead of pasting the listing into the LaTeX file itself.
I have to admit that it took more than two years until I finally found a really nice solution to this problem. To highlight certain lines of code, we now use the following command:
\qalisting[fontsize=\tiny]{code/02_create_pdf_styled.php}{
  \only<2>{
    \qahigh{5,...,10}
  }
  \only<3>{
    \qahigh{13,14}
  }
}
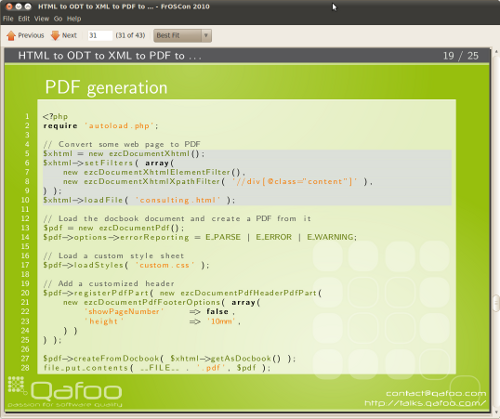
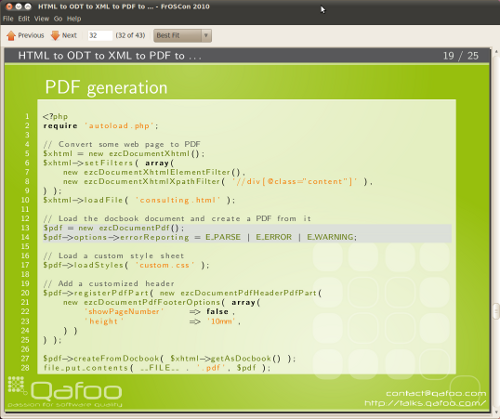
This sources the listing code/02_create_pdf_styled.php and displays it in font size \tiny. But instead of just generating a single beamer slide, it actually generates three: On the first slide, just the pure listing is shown. On the second one, the source code lines 5 to 10 are highlighted, and on the third one, lines 13 and 14. Simple, isn't it? You can see the results below (again click the images to see a larger variant).
 Highlighted lines 5 to 10
 Highlighted lines 13 and 14
So how does it work internally? OK, I don't really want to talk about this, since it is really hackish. In short: I use a TiKZ image where the listing is embedded as a node and then create additional nodes on the background layer of this image, using the line height of the listing font size. I put up the source code of the highlighting commands to Github, so you can use it in your presentations, if you want. Beware, the commands are not really configurable and you will need to adjust the code manually to suite your presentation style. Furthermore, it does only work with inclusion of external source code files and is stuck to PHP code for now (easily adjustable to other languages). Maybe its still useful for you.
If you know some LaTeX, I would love if you contribute additional options, like settings for the listing package or configurable styling. If you are a LaTeX guru and know how to fix some of the bigger issues, I would pretty much appreciate if you take some time, fork the code on Github and send me a pull request, or if you just send me a patch! Thanks in advance! :)
Comments